Homemade Halal Mochi (Daifuku) — Japanese Rice Cake with Red Bean Filling
Yes, traditional mochi is halal. This authentic daifuku recipe uses glutinous rice flour and homemade red bean paste (anko) — no gelatin, no mirin, no alcohol. Learn the full history of mochi in Japanese culture and follow our step-by-step method for perfectly soft, chewy, halal-certified Japanese rice cakes at home.

Yes — traditional mochi is halal. Made from glutinous rice flour, sugar, and water, the classic Japanese rice cake contains no animal-derived ingredients or alcohol. Homemade daifuku filled with anko (sweet red bean paste) is entirely halal-friendly when prepared with simple pantry staples. The concern arises only with commercial or store-bought mochi that may contain pork-derived gelatin, mirin (rice wine), or alcohol-based flavorings — all of which are easy to avoid when you make it yourself. This guide explains exactly what to look for and walks you through an authentic halal mochi recipe from scratch.
Mochi has been part of Japanese culinary tradition for more than a thousand years, yet it has never been more popular globally than it is today. From Tokyo convenience stores to specialty dessert shops in Kuala Lumpur, London, and New York, these soft, chewy rice cakes have captured the imagination of food lovers everywhere. For Muslim consumers, the question "is mochi halal?" is entirely reasonable — and the answer, when you make it at home, is a confident yes.
Is Mochi Halal? What You Need to Know
Traditional mochi is made from just three ingredients: glutinous rice flour (also sold as mochiko or sweet rice flour), sugar, and water. All three are plant-derived and unambiguously halal. The red bean filling (anko) used in classic daifuku is equally straightforward — cooked adzuki beans sweetened with sugar, nothing more.
The halal concerns arise with specific commercial products and certain traditional Japanese preparations:
- Gelatin: Some packaged and souvenir mochi products use pork-derived gelatin to extend shelf life and improve texture. Always check the ingredients list on commercial mochi. When making mochi at home, gelatin is never needed.
- Mirin: Traditional Japanese confectionery recipes occasionally call for mirin (sweet rice wine), which contains alcohol. Our recipe uses none — the sweetness comes entirely from cane sugar.
- Alcohol-based flavorings: Vanilla extract and some fruit essences use an alcohol carrier. For halal compliance, use non-alcoholic vanilla flavoring or simply omit it — the natural flavors of rice flour and red bean shine through.
- Emulsifiers: Mass-produced mochi sometimes contains E471 or other emulsifiers that may be animal-derived. Homemade mochi requires no emulsifiers.
The recipe below avoids every one of these issues. Every ingredient is clearly halal, and the method is designed so you can confidently serve this to family and guests observing Islamic dietary guidelines.
The History of Mochi in Japanese Culture
The story of mochi begins not in a confectionery kitchen but in a rice paddy. Glutinous rice — a short-grain variety so sticky it almost defies description — has been cultivated in Japan since the Jomon period, roughly 14,000 to 300 BCE. The Japanese discovered early on that pounding steamed glutinous rice into a smooth, elastic mass created something extraordinary: a food with a texture unlike anything else in the culinary world.
By the Nara period (710–794 CE), mochi had already taken on ritual and religious significance. It was offered at Shinto shrines, presented to the imperial court, and consumed during celebrations as a symbol of good fortune, longevity, and prosperity. The New Year (Oshogatsu) brought the tradition of kagami mochi — two round mochi cakes stacked to resemble a mirror, displayed as a sacred offering before being broken and eaten in January.
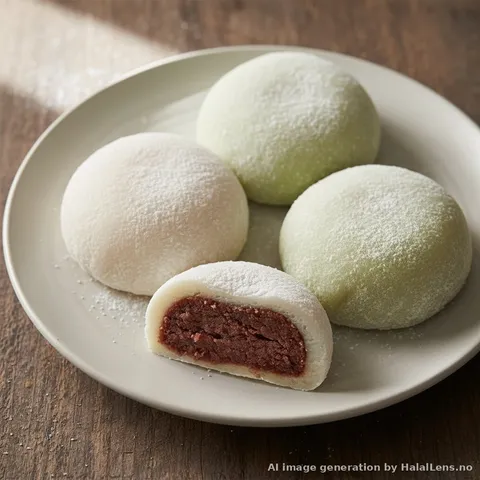
Daifuku mochi, the specific style we are making today, has its own distinct history. It evolved from an earlier confection called uzura mochi (quail rice cake) during the early Edo period (1603–1867). The original name was habotai mochi, meaning "thick belly rice cake," because the plump, filled shape resembled a rounded belly. Over time the name transformed into daifuku — written with the kanji 大福, meaning "great luck" or "big fortune." The sweet connotations of the name helped establish daifuku as a gift food, a celebration food, and a symbol of abundance.
During the Edo period, sugar was prohibitively expensive, and early daifuku fillings were often made with lightly salted red beans rather than the sweetened anko we know today. As sugar became more accessible through the Meiji period (1868–1912), sweet red bean paste became the defining filling, and the format we recognize today — smooth, pillowy mochi encasing a ball of anko — became standardized.
The art of making mochi by hand, called mochitsuki (餅つき), is itself a cherished cultural institution. Traditionally performed at New Year, mochitsuki involves steaming glutinous rice and then pounding it rhythmically in a large wooden mortar (usu) using heavy wooden mallets (kine). One person pounds while another turns and wets the dough between strikes — a choreography that requires trust, coordination, and considerable upper body strength. Today, mochitsuki ceremonies still take place at temples, community centers, and cultural festivals, both in Japan and in Japanese diaspora communities worldwide. Our microwave method produces the same silky, elastic dough in a fraction of the time, making it accessible for any home cook.
Modern daifuku has expanded far beyond the classic anko filling. Ichigo daifuku — whole strawberry encased in anko and mochi — became a sensation in the 1980s and remains enormously popular. Matcha mochi, black sesame mochi, yuzu cream daifuku, and mochi ice cream represent just a few of the innovations that have emerged in recent decades. The global spread of Japanese food culture has introduced mochi to consumers on every continent, and halal-certified mochi is now produced in Japan specifically for Muslim visitors and export markets.
Halal Adaptation Notes
This recipe requires no significant adaptation because traditional daifuku is already very close to halal by nature. Here is a summary of the specific substitutions and checks built into this recipe:
- No mirin, sake, or alcohol: The mochi dough uses only glutinous rice flour, sugar, and water. No rice wine or liqueur is called for at any stage.
- Homemade anko: Store-bought red bean paste is generally halal but varies by brand. Making anko from scratch takes about 90 minutes and gives you complete control. The recipe below includes a simple anko method.
- Potato starch or cornstarch dusting: Both are plant-derived and halal. Avoid any product labeled simply "starch" without specification, as some blends include modified starches processed with animal-derived enzymes.
- Food coloring (optional): Natural coloring from matcha powder is used for the green variation below. If using commercial food coloring, check for halal certification, as some red dyes (carmine/cochineal) are derived from insects.
Recipe Snapshot
| Yield | 12 daifuku mochi |
| Prep Time | 30 minutes (plus 1 hr for homemade anko) |
| Cook Time | 5–8 minutes (microwave method) |
| Difficulty | Intermediate |
| Cuisine | Japanese |
| Dietary | Halal, Gluten-Free, Vegan |
Ingredients
For the Mochi Dough
| Ingredient | Amount | Halal Status |
|---|---|---|
| Glutinous rice flour (mochiko / sweet rice flour) | 200 g (1½ cups) | HALAL |
| Cornstarch (for dusting) | 3–4 tbsp | HALAL |
| Granulated cane sugar | 80 g (6 tbsp) | HALAL |
| Water | 200 ml (¾ cup + 1 tbsp) | HALAL |
| Matcha powder (optional, for green variation) | 1½ tsp | HALAL |
For the Red Bean Paste (Tsubu-An — Chunky Style)
| Ingredient | Amount | Halal Status |
|---|---|---|
| Adzuki beans (dried) | 200 g (1 cup) | HALAL |
| Red bean paste (store-bought, halal-verified — see notes) | 360 g (if using store-bought) | HALAL |
| Granulated cane sugar | 150 g (¾ cup) | HALAL |
| Salt | ¼ tsp | HALAL |
Method
Part 1: Make the Anko (Red Bean Paste) — Skip if using store-bought
- Rinse and pre-boil the beans: Place the dried adzuki beans in a medium saucepan and cover with cold water by at least 5 cm. Bring to a boil over high heat, then drain immediately. This step (called shibukiri in Japanese) removes bitter compounds from the bean skins and produces a cleaner-flavored paste. Return the beans to the pot.
- Slow cook until very tender: Cover with fresh cold water by 5 cm. Bring to a boil, reduce to a low simmer, and cook uncovered for 60–75 minutes, adding water as needed to keep the beans submerged. The beans are ready when they crush completely between your fingers with minimal pressure. Drain, reserving a small amount of the cooking liquid.
- Sweeten and dry the paste: Return the drained beans to the pot with the sugar and salt. Cook over medium-low heat, stirring frequently with a wooden spatula, for 15–20 minutes. The paste will thicken, darken slightly, and pull away from the sides of the pot. The finished paste should hold its shape when scooped — if you draw a line through it with a spatula, the line should remain. Remove from heat and allow to cool completely.
- Portion the filling: Once cool, divide the anko into 12 equal portions (approximately 30 g each). Roll each portion into a smooth ball between your palms. Place on a parchment-lined tray, cover with plastic wrap, and refrigerate for at least 30 minutes. Cold anko is much easier to encase in warm mochi dough.
Part 2: Make the Mochi Dough (Microwave Method)
- Mix the dough batter: In a large microwave-safe glass bowl (at least 1.5 litre capacity), whisk together the glutinous rice flour, sugar, and water until completely smooth with no lumps. If making matcha mochi, sift the matcha powder into the flour before adding water. The batter will be quite thin — more like a thick liquid than a dough at this stage. This is correct.
- First microwave pass: Cover the bowl loosely with microwave-safe plastic wrap, leaving a small gap for steam to escape. Microwave on full power (900W) for 2 minutes. Remove and stir vigorously with a silicone spatula or wooden spoon. The edges will have begun to set while the center remains liquid — stir until fully combined.
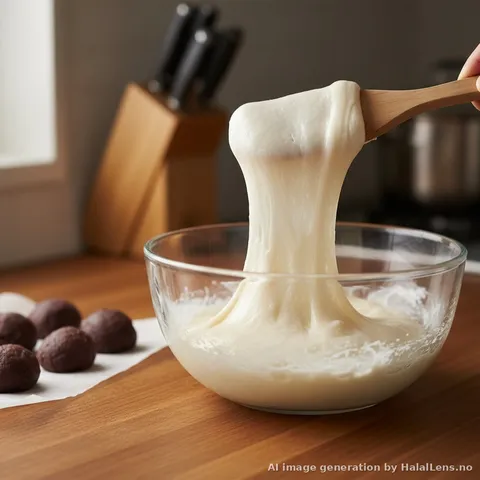
- Second microwave pass: Re-cover and microwave for another 90 seconds. Stir again. The mixture should now be mostly opaque, thick, and very sticky, with only a few slightly raw-looking patches. Continue microwaving in 30-second intervals, stirring between each, until the dough is completely translucent and smooth. Total microwave time is typically 4–6 minutes depending on your microwave wattage.
- Test for doneness: Properly cooked mochi dough is fully translucent (you should not see any white opaque patches), extremely sticky, elastic, and will stretch into long strands when pulled. It will be very hot — take care when handling.
- Prepare your work surface: While the dough is still hot, generously dust a clean work surface or large silicone mat with cornstarch. Spread cornstarch over a sheet of baking paper as well. Dust your hands liberally — you will need to re-dust frequently as the dough is extremely tacky.
- Transfer and divide the dough: Turn the hot mochi dough out onto the dusted surface. Dust the top of the dough generously. Using a bench scraper or silicone spatula, divide the dough into 12 roughly equal pieces (approximately 35–40 g each). Work quickly — the dough is easiest to shape while warm. If it cools and stiffens, microwave in 15-second bursts to restore pliability.
Part 3: Assembly
- Flatten each piece: Take one portion of mochi dough and flatten it into a disc approximately 8–9 cm in diameter using your fingertips. The edges should be slightly thinner than the center. Dust your fingertips frequently to prevent sticking.
- Place the filling: Set one chilled anko ball in the center of the mochi disc. Using your non-dominant hand, cup the mochi and filling while using the fingers of your dominant hand to stretch the edges of the mochi up and over the filling. Think of gathering a drawstring pouch closed.
- Seal the bottom: Pinch the gathered mochi edges firmly together, twisting slightly to create a tight seal. The seam is the bottom of your daifuku. If the mochi tears, moisten your fingertips with a tiny amount of water and press the torn edges together — they will fuse.
- Shape and dust: Gently roll the finished daifuku between your palms to create a smooth, round shape. Dust generously with cornstarch and place seam-side down on a parchment-lined tray. Repeat with the remaining portions.
- Rest before serving: Allow the finished daifuku to rest at room temperature for 15–20 minutes. The cornstarch coating will be absorbed by the surface, giving the mochi a matte, slightly velvety finish. Serve within 4–6 hours for best texture. Mochi hardens significantly when refrigerated — if you must store them cold, allow them to come to room temperature for 20 minutes before eating.
Tips and Variations
- Flour choice matters: Different brands of glutinous rice flour behave differently. Japanese Shiratamako (made from washed and dried glutinous rice) produces an exceptionally smooth, elastic mochi. Thai brand mochiko (Erawan) and Bob's Red Mill sweet rice flour are more widely available in Western markets and produce excellent results. Avoid substituting regular rice flour — it will not produce the right texture.
- Keep everything cold: The single most important technique for easy assembly is to refrigerate your anko balls thoroughly before wrapping. A warm filling causes the mochi to soften and tear. Some cooks even briefly chill the divided mochi pieces for 60 seconds before filling.
- Matcha variation: Sift 1½ teaspoons of culinary-grade matcha powder with the glutinous rice flour before adding water. This produces a beautiful pale green mochi with a subtle grassy bitterness that complements the sweet anko perfectly. Ceremonial-grade matcha is more expensive and is best reserved for drinking — culinary grade is ideal for baking and confectionery.
- Strawberry daifuku (Ichigo Daifuku): A beloved modern variation — wrap a fresh strawberry in a thin layer of anko before encasing in mochi. The tartness of the strawberry contrasts beautifully with the sweet paste and chewy rice cake. Use only small-to-medium strawberries so they fit within the mochi wrapping.
- Sesame filling variation: Combine 4 tablespoons of toasted black sesame seeds, ground to a rough powder, with 3 tablespoons of honey or agave syrup and a pinch of salt. This deeply nutty, aromatic filling is a traditional alternative to anko in some regions of Japan.
- Storage: Fresh mochi is best on the day it is made. If making ahead, wrap each piece individually in plastic wrap and store at cool room temperature for up to 24 hours. Do not refrigerate if avoidable — cold temperatures cause mochi to harden and lose its characteristic chew. For longer storage, freeze wrapped daifuku for up to 1 month and thaw at room temperature for 45 minutes before serving.
- Sizing for children: Make smaller 20 g dough portions with 15 g anko balls for a child-sized daifuku. Always supervise young children when eating mochi, as the sticky texture poses a choking risk if consumed too quickly or in large pieces.
AI disclosure: This recipe article was drafted with AI assistance and reviewed by HalalLens for accuracy and halal compliance.